
~CLICK ON IMAGES TO SEE FULL SIZE~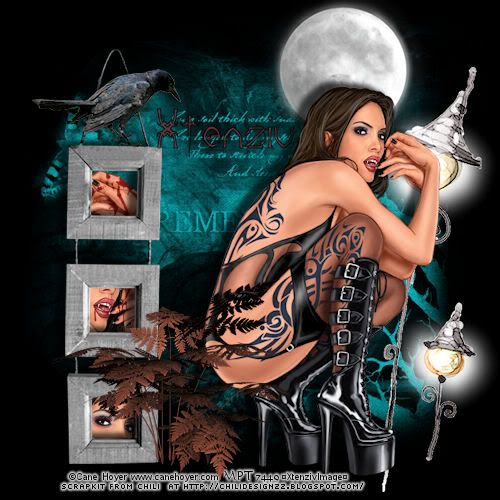
I am using artwork by Cane Hoyer you need a licence to use his art this can be purchased at My Psp Tubes (I used PhotoX2 but you should have no
Scrapkit from Chili at
Chili Designzz GhostTrain
Font:JIForked
Mask Vix_Mask395 by By Vix
Masks are found in the Goodies link, Download Vix_Mask 393-415 unzip to your masks folder.
This Tutorial was created using Corel's Paint Shop Pro®
with the understanding that you have a working knowledge of this program.
trouble recreating it with earlier versions of PSP)
Alrighty Lets get crackin!
First open a new image 500w X 500h Resolution 72.000 Pixel/inch
Raster Background transparent checked > Click OK
Open Chili Designz Ghost Train paper2
Image>Resize by 70% then again by 90%
**** DO THESE 2 RESIZE STEPS FOR EVERY ELEMENT
WHEN MAKING A 500 X 500 TAG ****
Copy and Paste paper2 to your new image.
Load mask from disk find Vix_Mask395
Source luminace> Fit to Canvas > Show all mask
all checked Click Load.
In your layers pallet right click Merge group.
Open Chili Designz Ghost Train frame2 ** DO THE RESIZE STEPS**
copy and paste to your tag. Move over to the left side of your tag.
I added a dropshadow Vert= -5 Horizontal= -9 opacity 68 and blur 7
Open Chili Designz Ghost Train grass ** DO THE RESIZE STEPS**
copy and paste to your tag, Resize again by 50% place beside the frame.
Open Chili Designz Ghost Train light2 ** DO THE RESIZE STEPS**
copy and paste to your tag. Mirror image over to the Right side of your tag.
Open Chili Designz Ghost Train crow ** DO THE RESIZE STEPS**
copy and paste to your tag. Resize again by 70% place on top of the frame.
Dropshadow Vert = -2 Horizontal = -6 opacity 68 and blur 7
Open Chili Designz Ghost Train moon ** DO THE RESIZE STEPS**
copy and paste to your tag.
Open your Tube and resize to your liking i resized by 80% then added a dropshadow Vert -5
Horizontal-9 opacity 68 and blur 7
Open Chili Designz Ghost Train light2 ** DO THE RESIZE STEPS**
copy and paste to your tag. Drag the light behind your tube if it covers it.
Now you can either go back and copy tube original (only resize if you wish) paste as new image under your frame duplicate 3 times and drag each one around in the frames until you have a piece of the tube in each frame
OR choose diferant tubes from same artist
Then Select your frame2 layer in the layers pallet.
choose your magic wand tool Mode Shift Match mode
Color Tolerance 0 contigous checked feather 0 Anti-alias checked
outside selected in the drop down.
click inside each one of the three frames < Selections, Modify, Expand by 5 click OK
Then selections invert click on each tube layer under the frame and press delete.
Add your name i use the font JI Forked size 48 and i lowered the layer opacity to 76
Click on layer 1 and flood fill with the color of your choise i made mine black.
Add your copyright information and licence # if any.
If you made your background black you should either use white for that info
or use a gradient glow of your liking.
Merge All Flatten and your done.
GREAT JOB!
THANK YOU SO MUCH FOR TRYING MY TUT!
This tutorial is my own creation. Any similarity to any other tut is coincidental and completely unintentional.
☼XtenzivImage☼ ©2009 -All artwork used remains the copyright of the creators
PLEASE DONT RIP OR STEAL
No comments:
Post a Comment