
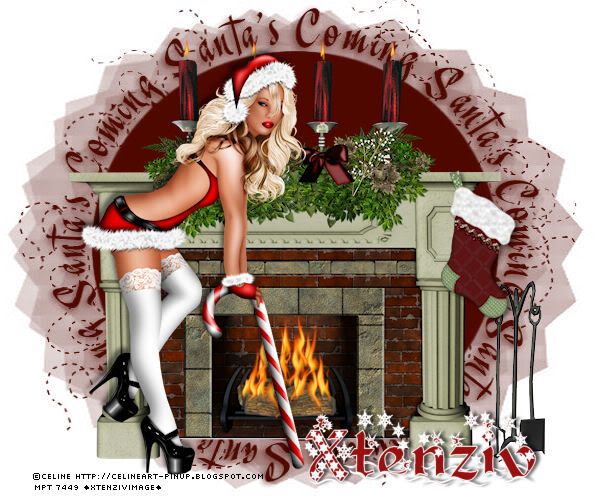
I am using the beautiful Artwork
of Celine You need a license to use her
art please visit her site to purchase them for you own personal use!
Scrapkit Crazy 4 by Sarah at Hungry Hill
Mask:Christmas7 Gabeebratt Masks
Font.Kingthings Christmas
This Tutorial was created using Corel's Paint Shop Pro® with the understanding that you have a working knowledge of this program. (I used PhotoX2 but you should have no trouble recreating it with earlier versions of PSP)
Open a new image 600 x 500 in order to stay within most pay to use artists terms of use the dpi or
resolution of the image can be no more than 72,000 DPI
Flood fill this layer with a dark red color from your tube, i used #4e0800
apply GabeeChristmas7 mask, merge your group.
Open fireplace and resize by 70%
Open mantlepiece and resize by 50%
Open stocking3 resize by 30% then again by 80%
Open fireplace tools and resize by 30%
I added a drop shadow to everything V=2 H=3 Opac=50 Blur= 6
Color= black #000000
****"save your work in progress "****
Now here is the tricky part.. included with paintshop pro is a fire tube, making the tube size 10 add a new layer and click once above the first
candle check it's the size you want/like then duplicate this 3 more times move each layer over it's own candle then merge each layer down
until your flames are merged with your candles
Now make the tube bigger and and smaller clicking multiple times over the wood . if you don't have this tube then use eyecandy 4000 or
Nature filters and add fire to your wood and to your candles.
If you can animate then by all means
Open your tube paste as new layer, resize as nessesary DON'T FORGET YOUR COPYRIGHTS. repeat the above drop shadow
Now add your name i used Kingthings Christmas size- 80 color: bg-#98100f stroke-#ffffff width 1 add a differant drop shadow I used
V= -1 H= 4 Blur =4 color black #000000 and tada your done.
GREAT JOB!
THANK YOU SO MUCH FOR TRYING MY TUT!
This tutorial is my own creation. Any similarity to any other tut is
coincidental and completely unintentional.
Please do not copy it, upload it to another website. You may share the link to
the blog or the tutorial page directly.
☼XtenzivImage☼ ©2010 -All artwork used remains the copyright of the creators.


