
I'm using the beautiful Artwork
of The Hunter
You require a license to use this artist.
Now selling at PTE
Font: Romance Fatal Serif
PTU Scrapkit Tainted by Hungry Hill purchase this kit and many other fabulous kits Here
Mask from WeeScotsLass Mask WSL_266
It will be in the 241-300 4shared link on the right.
This Tutorial was created using Corel's Paint Shop Pro®
With the understanding that you have working knowledge of this program.
(I used PhotoX3 but you should have no trouble recreating it
with earlier versions of PSP)
Open a new image 600 X 500 transparent 72dpi
open paper 9 copy and paste onto your tag as a new layer
apply WSL mask source luminance fit to canvas and hide all mask selected.
open and resize smear by 80% place near the bottom
open and resize lattice by 60% duplicate and mirror
add drop shadow
V= -2 H=2 O=100 blur 2 color black to both i did this step twice.
Open The Hunter Leo-Zodiac
drop shadow with V= -4 H=4 O=59 blur 5 color black.
(to hide her butt like i did duplicate the girl)
open and resize WA_Tarnished by 80%
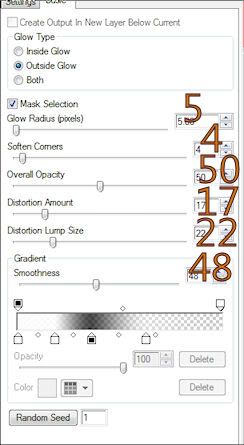
apply gradient glow
I used eyecandy 5 check outside glow/ glow radius 5/ soft corners 4/ overall opacity 50/
distortion 17/ lump size 22/ smoothness 48
double white then black then white
(move it around till it hides her butt, when happy Slide the tarnished WA to between the two girl layers now erase the top girls butt, this leaves her boots on top of the WA.)
Added my font Romance Fatal serif size 65 black outline stroke width 1
#7f5437 R=127 G=84 B=55 for the color placed just inside the frame on the bottom.
Repeat the glow side under the girl so it looks like shes touching it.
open and resize rose by 30% then flip the image place near the bottom
open and resize letterbox by 30% place near the bottom in front of the stem cutoff of the rose.
That's it your done! Merge all flatten.
*****DON'T FORGET YOUR COPYRIGHT INFORMATION*****
GREAT JOB!
THANK YOU SO MUCH FOR TRYING MY TUT!
This tutorial was created Nov 10 2011.
Any similarity to any other tut is coincidental and completely unintentional.
Please do not copy or upload this tutorial to another website.
You may share the link to the blog or the tutorial page directly.
☼XtenzivImage☼
2011
-All artwork used remains the copyright of the owner.
