
Tuesday, November 9, 2010

Ice Goddess


I am using the beautiful Artwork
of Jose Cano You need a license to use his
art please visit his site to purchase his art for you own personal use!
Scrapkit Ice Angel by Sarah at Hungry Hill
Mask:SG Stenciled Flower circle Essex Girl Masks
Font.Kingthings wrote and Miss Le Gates


This Tutorial was created using Corel's Paint Shop Pro® with the understanding that you have a working knowledge of this program. (I used PhotoX2 but you should have no trouble recreating it with earlier versions of PSP)


Open IceAngel paper 11 and click Copy,
Then open a new image 600 W X 500 H transparent,
Select all and paste paper into selection
Apply sgstencilled Mask now apply a drop shadow
-3V 4H Op 71 Blur 6 Color black.
Open Wreath resize by 65% drag to your canvas..
close original Don't save changes!
open snowy tree one resize by 80% add the same drop shadow.


* if your like me and you never
save your work in progress this is a good spot to remember save this file as a psp image

( i created a WIP (work in progress) folder in my psp folder eg: C:\Users\Xtenziv\Documents\My PSP Files\WIP)
it's also good to keep a copy so you can change the name
used on it as often as you like**


Open ribbon 3 resize by 80% move to the bottom of your tag.
Open gift 1 and 3 resize by 25% place 3 in the front
and merge these two layers together
Open lanturns resize by 50% place at the top of your wreath
repeat the drop shadow
Open your tube paste as new layer.DON'T FORGET YOUR COPYRIGHTS.
Open Ice-WA resize by 50 % using kingthings wrote font size 48 color
# 93bad1 bkgd, and stroke color Black.
merge these two layers together now add Eyecandy 5 Impact gradient glow.
Settings outside glow/ mask selection checked
glow radius 7, soft corners 16, opac 71
dist 0, distlump size 64, gradient smooth,100 the color bar at the bottom is
white, black, white
random seed 1 if you dont have this filter try adding a white drop shadow V -1 and H1 then repeat only opposite H -1 and v1 then do the same again using black as the color.. play around find a setting you like.
Now add your name i used Miss le Gates and tada your done.


GREAT JOB!


THANK YOU SO MUCH FOR TRYING MY TUT!


This tutorial is my own creation. Any similarity to any other tut is
coincidental and completely unintentional.
Please do not copy it, upload it to another website. You may share the link to
the blog or the tutorial page directly.
☼XtenzivImage☼ ©2010 -All artwork used remains the copyright of the creators.

Monday, November 1, 2010

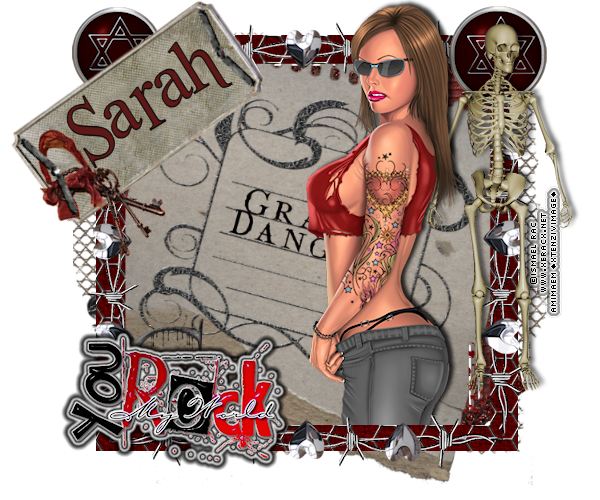
Grave Rocker


Photobucket


I am using the beautiful Artwork
of Ismael Rac
You need a license to use his art please visit his site to purchase
his art for you own personal use!
Scrapkit Grave Danger by you can purchase this kit
Creative Crazy Scraps
Supplies: FONT AND WORD ART
Font: Romance Fatal Serif Included in Supplies Zip but if you would like to
download from DaFont the link is provided
Word art By Creative Misfit's I colorized it and added
Eye Candy 5 Impact gradient glow filter, and included it in my supplies but
please check out the rest of the amazing word art in that zip, Misfits have some
creative members you'll be glad you looked!
This Tutorial was created using Corel's Paint Shop Pro®
with the understanding that you have a working knowledge of this program.
(I used PhotoX2 but you should have no trouble recreating it with earlier versions of PSP)


**Program Tip: you can click and drag open items onto a working canvas, in order
to do this you need to have
your layers palette open then just select the layer you want then click and drag
it to your canvas**


 Open CCS paper 11 now open CCS Wire Mesh copy and paste as a new layer/ Shift D to duplicate and close original
images DO NOT SAVE CHANGES. Now on the duplicate Merge the two layers together, using your rectangle selection tool draw out a selection from the edge of the mesh on one side to the edge of the mesh on the other now selections/ modify/ select selection borders/ size 30
you should now have a frame shaped selection. Copy


Open a new image 600 W X 500 H transparent then paste your
frame as a new layer. Open CCS Heart wire resize by 80% paste as new layer
Duplicate/ image, flip make sure your on the top heart wire layer and Merge
down, Duplicate,  Free rotate single layer 90% either direction depends on
your liking, make sure your frame all lines up then Merge all visible.


* if your like me and you never
save your work in progress this is a good spot to remember save this file as a psp image

( i created a WIP (work in progress) folder in my psp folder eg: C:\Users\Xtenziv\Documents\My
PSP Files\WIP) it's also good  to keep a copy so you can change the name
used on it as often as you like because it's saving the files in layers**


Open CCS Cluster paper, drag paper to your canvas now drag
that layer below your frame layer. Open your tube paste as new layer between
cluster element and frame I resized mine by 80 % then add a drop shadow 2V 4H Op
57 Blur 6 Color black, Duplicate and drag this layer above the frame, on that
layer use your eraser tool to erase her legs. Here I added my copyrights, I
choose to add a gradient glow to mine so they stand out, you could also use a
slight white drop shadow.


Open CCS brad and resize by 30% copy and paste as new layer
Close original do not save changes, Duplicate and put a brad on each side of the
frame.


Open CCS tag resize by 50% copy and paste as new layer Close
original do not save changes, using your Pick tool pivot rotate your tag left to
the top corner see my tag for positioning. Here I added my font Romance Fatal
serif size 72


Open CCS skeleton resize by 25% copy and paste as new layer
Close original do not save changes, move to the right side see my tag for
positioning.


If you would like to use your own word art and have eye candy
5 impact just mess around with the settings until you are satisfied, if not open
rock word art from my supplies copy and paste as new layer


GREAT JOB!


THANK YOU SO MUCH FOR TRYING MY TUT!


This tutorial is my own creation. Any similarity to any other tut is
coincidental and completely unintentional.
Please do not copy it, upload it to another website. You may share the link to
the blog or the tutorial page directly.
☼XtenzivImage☼ ©2010 -All artwork used remains the copyright of the creators.