
This tut was originally posted in my main blog in Feb of 2009 i'm just moving it over here.. and hey maybe to some it will seem brand new!~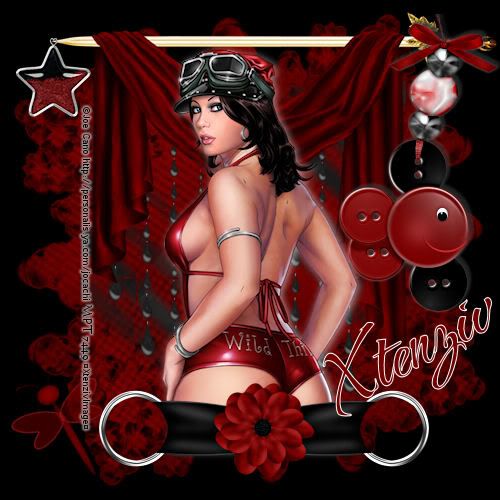
I am using a ©Joe Cano image you need a
licence to use his art which can be purchased from
My Psp Tubes
Scrapkit By Mysterious Scrapgirl
Font: The Nautigal
(Just having the .TTF file open and minimized on your task bar
will allow PsP to detect your font without you having to install it.)
Mask is WSL_Mask 176 and WSL_277 By Chelle Masks are found in
the navigation link. Place these files in your masks folder.
This Tutorial was created using Corel's Paint Shop Pro® with the understanding
that you have a working knowledge of this program.
(I used PhotoX2 but you should have no trouble recreating it with earlier versions of PSP)
I was trying so hard to avoid the whole copy paste kind of tags because they don't teach much more than copy and paste, but i like it so here it is.
Open a new image 500 X 500 transparent and flood fill with a color that compliments the page it's being posted on,
i Chose Black because my blog background is black and i want to use it as my header.
Open MSG-Red and Black Paper 19 and paste to new image as a new layer.
Apply WSL_Mask277, source luminance> show all mask> fit to layer.
right click the mask in layer pallet, merge group.
Open MSG-Red and Black Paper2 resize by 50% copy and paste to image as a new layer.
Apply WSL_Mask176, source luminance> show all mask> fit to layer.
Right click the mask in layer pallet, merge group
Open Red and Black Raindrops1 resize by 50% copy and paste to image as a new layer.
Using your selection tool copy and cut the outside raindrop line on both sides and paste as new layers under the short
raindrop lines
(after cut short raindrop line would be 3rd one in.) merge all 3 raindrop layers.
Open Red and Black Swag2 resize by 60% copy and paste to image as a new layer, move to the top center of your tag.
Open Red and Black Dragonfly3 resize by 40% paste as new layer, free rotate left by 30, move to the bottom left.
Open Red and Black Buttonstring5 move up to cover the sword handle
i added a drop shadow mine is V -2 H 3 Opac
40 Blurr 11 Color White.
Open Red and Black Star2 resize by 50% paste as a new layer i put mine on the tip of the sword.
Add main tube i added a drop shadow mine is V -2 H 3 Opac 50 Blurr 11 Color White.
Then i covered up her bottom end with Red and Black Eyelet6.
Change forground to white, background #740000add your name I used The Nautigal size 100 stroke width 1.
I rotated the vector text to make it fit.
add any other elements that you like from the kit.
Add all your copyrights, **note if you used a black bkg make sure your © info is in a color you can see**
(or use Eyecandy 4000 Gradiant glow : glow width 3.00, soft corners 25 opac 100 and check draw only outside)
Add your license info and taggers mark if any.
Merge All Flatten and your done.
GREAT JOB!
THANK YOU
SO MUCH FOR TRYING MY TUT!
This tutorial is my own creation. Any similarity to any other tut is coincidental and completely unintentional.
Please do not copy it, upload it to another website you may share the link to the blog or the tutorial page directly.
☼XtenzivImage☼ ©2009 -All artwork used remains the copyright of the creators